Add Google Analytics Code to Your flipbook Site
Google Analytics is a popular, powerful reporting and metrics tool for site owners.
Google Analytics has seen a number of recent changes — changes to the ways referrer data passes, changes to the analytics reporting interface, and with future hints of change as integration with Google’s social expansion deepens.
Changes aside, for many site owners Google Analytics is good enough — especially because Google Analytics is free.
And because it’s Google Analytics, site owners often have a Google account established for other Google services like Gmail.
Adding Google Analytics to an existing Google account is a five-minute deal, dropping the barrier to entry.
Here are the steps of how to add Google Analytics to your flipbook website — running FlipBook Creator, of course!
If You Don’t Have a Google Account
No Google account? No problem. Go to google.com, click “Sign In” at the top-right of the black bar, then click “Sign up for a new Google Account.”
Once you have a Google Account — and are logged into it — you can add Google Analytics to be a “Product” associated with your Google account.
Name your account (for your own reference), enter your site URL, and in general, fill out the Google Analytics form as you would any other.
Installing Google Analytics in FlipBook Creator — Interface Method
At this point, you either had an existing Google account and added Google Analytics to your existing products, or you have created a new Account entirely and added Google Analytics as part of the process.
Now you need to insert the unique Google Analytics code to begin data collection on that domain.
then start flipbook creator:
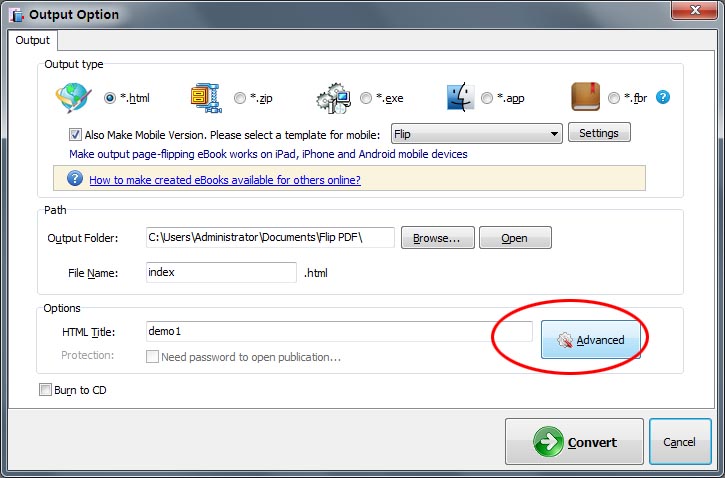
Step 1: Output the flipbook as Flash&Html5
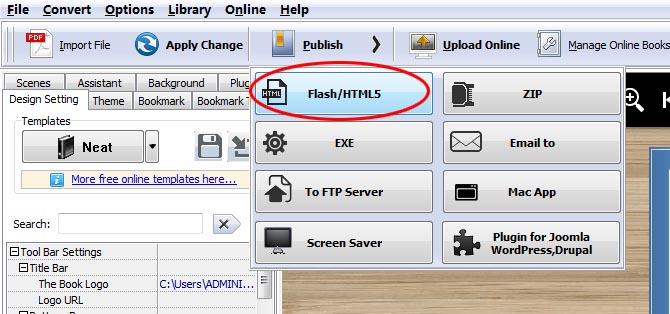
In the output interface, click advanced button;
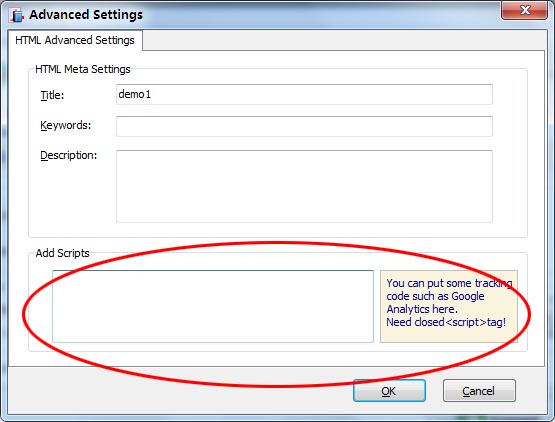
Step 2: Input Google Analytics Code
Paste your code into Additional Scripts, save — and you’re done!
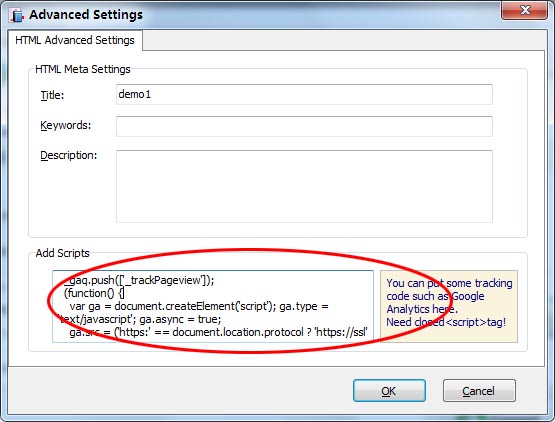
Sample Code:
<script type="text/javascript">
var _gaq = _gaq || [];
   _gaq.push(['_setAccount', 'UA-XXXXXXXX']);
   _gaq.push(['_trackPageview']);
  (function() {
     var ga = document.createElement('script'); ga.type = 'text/javascript'; ga.async = true;
    ga.src = ('https:' == document.location.protocol ? 'https://ssl' :  'http://www') + '.google-analytics.com/ga.js';
    var s = document.getElementsByTagName('script')[0];
    s.parentNode.insertBefore(ga, s);
    })();
</script>
Note the UA-XXXXXXXX placeholder — replace this with your unique tracking code.
However you added your GA code — via the interface or a custom function — when you visit your Google Analytics dashboard, you should now see indications that metrics processing and data collection have begun.
Free download FlipBook Creator
Free download FlipBook Creator Professional
Free download Photo to FlipBook